JWT Authenciation (with Spring boot)
Authentication and authorization are very important services in server side development.In this post, I will introduce how to handle authentication and authorization on RESTful Apis powered by Spring Boot. Then I will start from a very simple Spring Boot application that exposes public endpoints and I will secure these endpoints and authorize accesses to particular users with Spring Security and JWT.
Securing RESTful APIs with JWTs
JSON Web Tokens, commonly known as JWTs, are tokens that are used to authenticate users on applications. This technology has gained popularity over the past few years because it enables backends to accept requests simply by validating the contents of these JWTS. That is, applications that use JWTS no longer have to hold cookies or other session data about their users. This characteristic facilitates scalability while keeping applications secure.
During the authentication process, when a user successfully logs in using their credentials, a JSON Web Token is returned and must be saved locally (typically in local storage). Whenever the user wants to access a protected route or resource (an endpoint), the user agent must send the JWT, usually in the Authorization header using the Bearer schema, along with the request.
When a backend server receives a request with a JWT, the first thing to do is to validate the token. This consists of a series of steps, and if any of these fails then, the request must be rejected. The following list shows the validation steps needed:
- Check that the JWT is well formed
- Check the signature
- Validate the standard claims
- Check the Client permissions (scopes)
Before diving into the implmentation details, let’s take a look at the general structure that Jwt Service embraces.

Integrate JWTs to Spring Boot Application
JWTs authentication is not natively included in Spring Security. But it’s quite easy to implement such a light-weight authentication service by customizing the OncePerRequestFilter filter. Before that, I will introduce how Spring Security works. Spring Security is a very powerful framework that enable developers to enable secure sessions with much efforts. The basic auth is the default scheme that Spring Security adopts to secure the sessio. However, cookies based authentication is a very painful work when your applications scales up and you need to maintain the security of those connected sessions which is vulnerable to be hacked if messy management is conducted. Therefore, Jwts as a sessionless and light-weight auth service is embraced by many developers.
To support both authentication and authorization in our application, we are going to:
- implement an authentication filter to issue JWTS to users sending credentials,
- implement an authorization filter to validate requests containing JWTS,
- create a custom implementation of
UserDetailsServiceto help Spring Security loading user-specific data in the framework,and extend theWebSecurityConfigurerAdapterclass to customize the security framework to our needs.
The Authentication Filter and EntryPoint
The first element that we’re going to create is the class responsbile for the authentication process. Let’s call it JWTAuthenticationFilter.
public class JwtAuthenticationFilter extends OncePerRequestFilter {

    @Autowired
    private JwtTokenProvider tokenProvider;

    @Autowired
    private CustomUserDetailsService customUserDetailsService;

    private static final Logger logger = LoggerFactory.getLogger(JwtAuthenticationFilter.class);

    @Override
    protected void doFilterInternal(HttpServletRequest request, HttpServletResponse response, FilterChain filterChain) throws ServletException, IOException {
        try {
            String jwt = getJwtFromRequest(request);

            if (StringUtils.hasText(jwt) && tokenProvider.validateToken(jwt)) {
                Long userId = tokenProvider.getUserIdFromJWT(jwt);

                /*
                    Note that you could also encode the user's username and roles inside JWT claims
                    and create the UserDetails object by parsing those claims from the JWT.
                    That would avoid the following database hit. It's completely up to you.
                 */
                UserDetails userDetails = customUserDetailsService.loadUserById(userId);
                UsernamePasswordAuthenticationToken authentication = new UsernamePasswordAuthenticationToken(userDetails, null, userDetails.getAuthorities());
                authentication.setDetails(new WebAuthenticationDetailsSource().buildDetails(request));

                SecurityContextHolder.getContext().setAuthentication(authentication);
            }
        } catch (Exception ex) {
            logger.error("Could not set user authentication in security context", ex);
        }

        filterChain.doFilter(request, response);
    }

    private String getJwtFromRequest(HttpServletRequest request) {
        String bearerToken = request.getHeader("Authorization");
        if (StringUtils.hasText(bearerToken) && bearerToken.startsWith("Bearer ")) {
            return bearerToken.substring(7, bearerToken.length());
        }
        return null;
    }
}
When the user request routes to the server side, this filter will be triggerd. Basically, the above codes are to check whether the jwt token is valid. For the token validation, we can inject the io.jsonwebtoken depency and create a token validator to help.
@Component
public class JwtTokenProvider {
    private final Logger logger = LoggerFactory.getLogger(this.getClass());

    @Value("${app.jwtSecret}")
    private String jwtSecret;

    @Value("${app.jwtExpirationInMs}")
    private int jwtExpirationInMs;

    public String generateToken(Authentication authentication) {

        UserPrincipal userPrincipal = (UserPrincipal) authentication.getPrincipal();

        Date now = new Date();
        Date expiryDate = new Date(now.getTime() + jwtExpirationInMs);

        return Jwts.builder()
                .setSubject(Long.toString(userPrincipal.getId()))
                .setIssuedAt(new Date())
                .setExpiration(expiryDate)
                .signWith(SignatureAlgorithm.HS512, jwtSecret)
                .compact();
    }

    public Long getUserIdFromJWT(String token) {
        Claims claims = Jwts.parser()
                .setSigningKey(jwtSecret)
                .parseClaimsJws(token)
                .getBody();

        return Long.parseLong(claims.getSubject());
    }

    public boolean validateToken(String authToken) {
        try {
            Jwts.parser().setSigningKey(jwtSecret).parseClaimsJws(authToken);
            return true;
        } catch (SignatureException ex) {
            logger.error("Invalid JWT signature");
        } catch (MalformedJwtException ex) {
            logger.error("Invalid JWT token");
        } catch (ExpiredJwtException ex) {
            logger.error("Expired JWT token");
        } catch (UnsupportedJwtException ex) {
            logger.error("Unsupported JWT token");
        } catch (IllegalArgumentException ex) {
            logger.error("JWT claims string is empty.");
        }
        return false;
    }
}
After the authentication, we might need to check if the user credential in case any hacker can steal a validated token by MID attack and inject it to a mallious request. UsernamePasswordAuthenticationFilter is provided by Spring Security to help conduct credential validation. Notice that, Spring Security requires developers to implement the UserDetails interface to facilitate such process. Normally, it’s just to adapter your user profile schema to a UserDetails instance. We will introduce how to configure such filters in the configuration method later.
Create a UserPrincipal that implement *UserDetails to facililate UsernamePasswordAuthenticationFilter*
public class UserPrincipal implements UserDetails {
    private Long id;

    private String name;

    private String username;

    @JsonIgnore
    private String email;

    @JsonIgnore
    private String password;

    private Collection<? extends GrantedAuthority> authorities;

    public UserPrincipal(Long id, String name, String username, String email, String password, Collection<? extends GrantedAuthority> authorities) {
        this.id = id;
        this.name = name;
        this.username = username;
        this.email = email;
        this.password = password;
        this.authorities = authorities;
    }

    public static UserPrincipal create(User user) {
        List<GrantedAuthority> authorities = user.getRoles().stream().map(role ->
                new SimpleGrantedAuthority(role.getRole())
        ).collect(Collectors.toList());

        return new UserPrincipal(
                user.getId(),
                user.getName(),
                user.getLastName(),
                user.getEmail(),
                user.getPassword(),
                authorities
        );
    }

    public Long getId() {
        return id;
    }

    public String getName() {
        return name;
    }

    public String getEmail() {
        return email;
    }

    @Override
    public String getUsername() {
        return username;
    }

    @Override
    public String getPassword() {
        return password;
    }

    @Override
    public Collection<? extends GrantedAuthority> getAuthorities() {
        return authorities;
    }

    @Override
    public boolean isAccountNonExpired() {
        return true;
    }

    @Override
    public boolean isAccountNonLocked() {
        return true;
    }

    @Override
    public boolean isCredentialsNonExpired() {
        return true;
    }

    @Override
    public boolean isEnabled() {
        return true;
    }

    @Override
    public boolean equals(Object o) {
        if (this == o) return true;
        if (o == null || getClass() != o.getClass()) return false;
        UserPrincipal that = (UserPrincipal) o;
        return Objects.equals(id, that.id);
    }

    @Override
    public int hashCode() {

        return Objects.hash(id);
    }
}
After authentication and user credential authorization, we will want to handle exception during these processes. We can customize a entryPoint component extends AuthenticationEntryPoint and override the commence method to customize return messages. Generally speaking, we will encounter invalid token (unauthorized) and bad credential exceptions.
	@Component
	public class JwtAuthenticationEntryPoint implements AuthenticationEntryPoint {

	    private static final Logger logger = LoggerFactory.getLogger(JwtAuthenticationEntryPoint.class);
	    @Override
	    public void commence(HttpServletRequest httpServletRequest,
	                         HttpServletResponse httpServletResponse,
	                         AuthenticationException e) throws IOException, ServletException {
	        logger.error("Responding with unauthorized error. Message - {}", e.getMessage());
	        if(e instanceof BadCredentialsException) {
	            httpServletResponse.setContentType(MediaType.APPLICATION_JSON_VALUE);
	            Result invalidUserNameOrPassword = ControllerUtils.buildErrorResult(101, "Incorrect account or password");
	            httpServletResponse.getOutputStream().write(new ObjectMapper()
	                    .writeValueAsBytes(invalidUserNameOrPassword));
	        } else {
	            httpServletResponse.sendError(HttpServletResponse.SC_UNAUTHORIZED,
	                    "Unauthorized access");
	        }
	    }
	}
With customizing filters and tokenValidator, we have made it clear that it perfomrs certain jwt authentication while usesrs requesting protected resources. The next step is make a configure the request routes so that the backend server will handle the security checking.
    @Override
    protected void configure(HttpSecurity http) throws Exception {
        http
                .cors()
                    .and()
                .csrf()
                    .disable()
                .exceptionHandling()
                    .authenticationEntryPoint(unauthorizedHandler)
                    .and()
                .sessionManagement()
                    .sessionCreationPolicy(SessionCreationPolicy.STATELESS)
                    .and()
                .authorizeRequests()
                    .antMatchers("/",
                        "/favicon.ico",
                        "/**/*.png",
                        "/**/*.gif",
                        "/**/*.svg",
                        "/**/*.jpg",
                        "/**/*.html",
                        "/**/*.css",
                        "/**/*.js")
                        .permitAll()
                    .antMatchers("/api/auth/**")
                        .permitAll()
                    .antMatchers("/api/user/checkUsernameAvailability", "/api/user/checkEmailAvailability")
                        .permitAll()
                    .antMatchers(HttpMethod.GET, "/api/polls/**", "/api/users/**")
                        .permitAll()
                    .anyRequest()
                        .authenticated();

        // Add our custom JWT security filter
        http.addFilterBefore(jwtAuthenticationFilter(), UsernamePasswordAuthenticationFilter.class);

    }
configure(HttpSecurity http): a method where we can define which resources are public and which are secured. In our case, we set the SIGN_UP_URL endpoint as being public and everything else as being secured. We also configure CORS (Cross-Origin Resource Sharing) support throughconfigure(AuthenticationManagerBuilder auth): a method where we defined a custom implementation ofUserDetailsServiceto load user-specific data in the security framework. We have also used this method to set the encrypt method used by our application (BCryptPasswordEncoder).SessionCreationPolicy.STATELESSindicates that request is not session-based therefore no cookies will be returned to the client side thus avoiding cookies hack.
With addFilterBefore() method, it tells that jwtAuthenticationFilter will triggered before UsernamePasswordAuthenticationFilter.
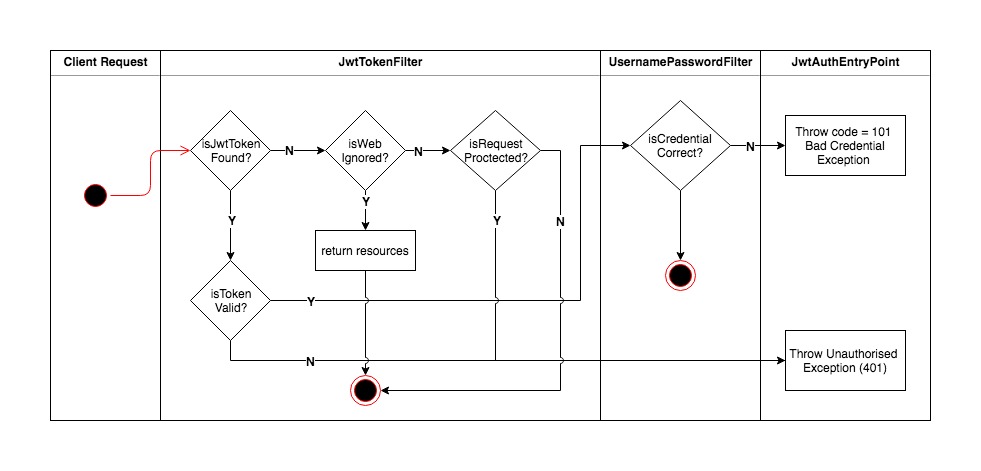
To summarize, I have drafted a chart to show the flow how jwt authentiction works with Spring Security.
Reference
https://auth0.com/blog/implementing-jwt-authentication-on-spring-boot/
https://github.com/callicoder/spring-security-react-ant-design-polls-app